How to Fit a Dog Harness Correctly: The Step-by-Step Guide
Most harness problems — escapes, chafing, restricted movement, and dogs that refuse to wear them — trace back to one root cause: the harness was never fitted correctly in the first place. A harness that fits right is one your dog barely notices. A harness that fits wrong is one they fight every single walk. This guide covers the exact fitting process, the one rule that applies to every harness design, and the breed-specific adjustments most guides completely ignore.
How to Fit a Dog Harness — Quick Answer
A correctly fitted dog harness follows the two-finger rule: you should be able to slide exactly two fingers under any strap — the neck loop, chest strap, and belly band — when the harness is on and adjusted. Tighter than two fingers restricts movement and causes chafing. Looser than two fingers creates an escape risk. Measure your dog’s chest girth before buying, not just their weight, and adjust all straps independently after putting the harness on.
- Step 1 — Measure chest girth before buying (widest point behind front legs)
- Step 2 — Put the harness on using the correct entry method for the design type
- Step 3 — Adjust neck loop, chest strap, and belly band independently
- Step 4 — Apply the two-finger rule to every strap
- Step 5 — Test fit under movement — watch for shifting, chafing points, and escape attempts
Step 1 — Measure Before You Buy (or Adjust)
The single most common harness fitting error happens before the harness is ever put on: sizing by weight instead of by measurement. Weight-based sizing assumes all dogs of the same weight have the same body proportions — and they don’t. A 15 lb French Bulldog has a chest circumference 4–6 cm wider than a 15 lb Whippet at the same weight. One will need a medium. The other a small. The weight label on the packaging will give you the same size for both.
How to Measure Your Dog’s Chest Girth
- Have your dog stand on all four legs — not sitting, not lying down
- Take a soft tape measure and wrap it around the widest point of the chest — this is just behind the front legs, at the deepest part of the rib cage
- The tape should sit flat against the body with no slack and no compression — exactly as snug as you want the harness to sit
- Record the measurement in centimetres
- Compare against the brand’s published chest girth chart — not the weight chart
Also measure neck circumference for overhead harnesses — the neck loop must be wide enough to go over the head during fitting but snug enough not to slide off during wear. Measure at the base of the neck where the harness will sit, not at the throat.
If your dog falls between two sizes on the chart, size down for narrow-bodied breeds (Greyhounds, Dachshunds, Chihuahuas) and size up for broad-chested breeds (French Bulldogs, Staffordshire Bull Terriers, Pugs).
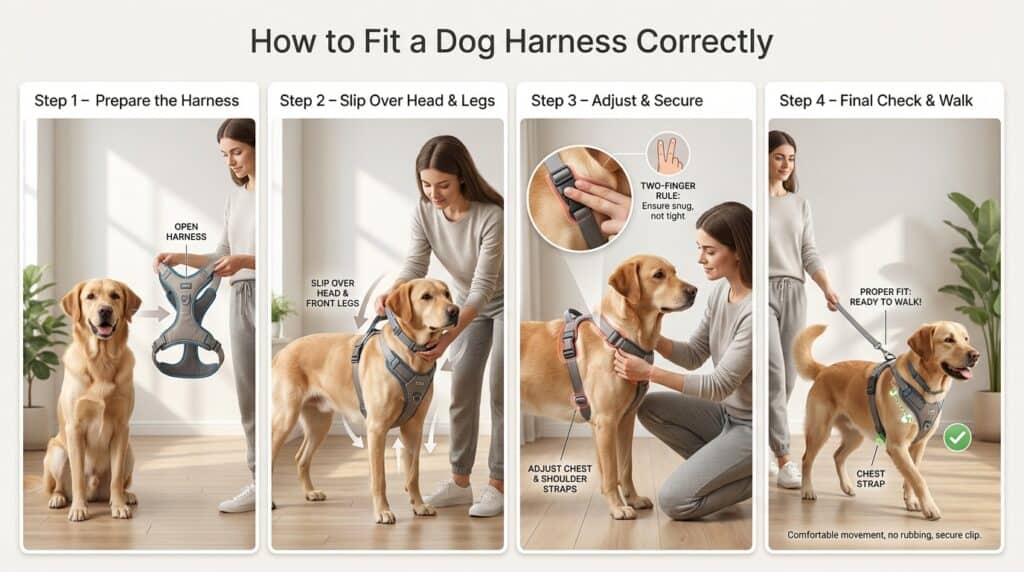
Step 2 — Putting the Harness On Correctly
Different harness designs require different entry methods. Using the wrong technique stresses both the dog and the hardware — and makes fitting harder than it needs to be.
| Harness Type | Entry Method | Common Mistake |
|---|---|---|
| Overhead vest | Slip neck opening over head, guide front legs through leg openings, clip or buckle under belly | Forcing the neck loop over a tense dog’s head — wait for calm, reward with treat at entry point |
| Step-in | Lay flat on ground, have dog step front paws into leg openings, lift and clip over back | Lifting before both paws are fully through — causes twisting and incorrect strap position |
| Figure-8 / wrap | Feed one loop around chest, second loop around torso, clip at back | Applying loops in wrong order — chest loop always goes on first, torso second |
| H-style / Roman | Neck loop over head, belly strap buckled under, chest strap across front | Leaving belly strap unbuckled — harness will shift and lose security immediately |
For dogs that resist harness fitting: Never force the harness on a tense or pulling-away dog. Feed a high-value treat as the harness approaches and again as each piece goes on. Within 5–10 sessions of treat-paired fitting, most dogs stand calmly or actively push into the harness in anticipation of the treat. Patience during the introduction phase prevents a lifetime of harness battles.
Step 3 — The Two-Finger Rule (Apply to Every Strap)
Once the harness is on, every adjustment decision comes back to one rule: exactly two fingers should slide comfortably under any strap. Not one finger with effort. Not three fingers easily. Two fingers — snug but not tight.
Apply this rule to each of the following, in order:
1. Neck Loop
Slide two fingers under the neck strap at the back of the neck (not the throat). The loop should sit at the base of the neck — not riding up toward the ears or down toward the shoulders. If the loop sits loose enough to slide toward the shoulders under light forward pressure, tighten it. A neck loop that migrates down becomes a throat collar under load — exactly what a harness is designed to prevent.
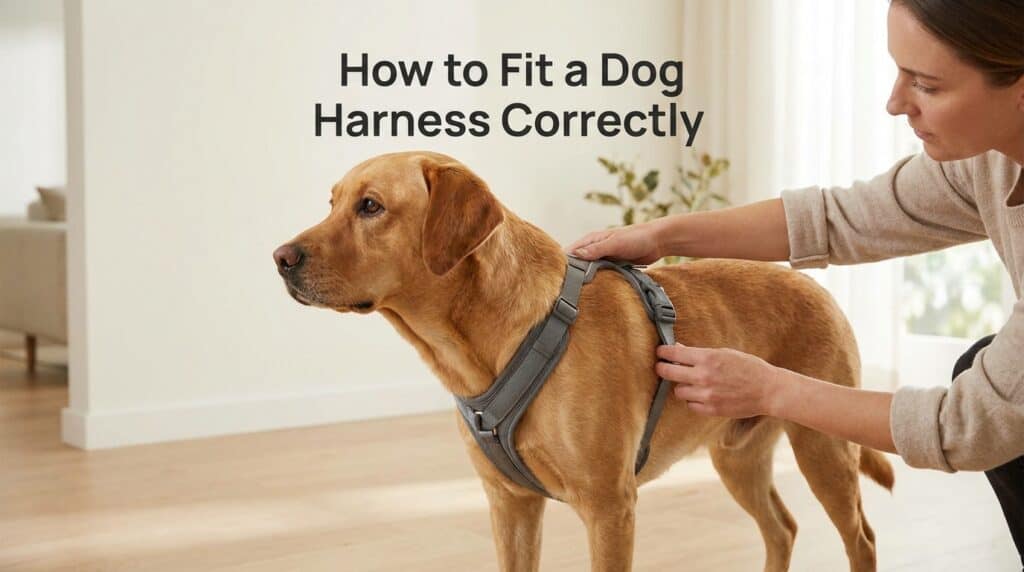
2. Chest Strap
The chest strap should sit across the sternum — the flat bone between the front legs. Two fingers should fit underneath. Check that the strap doesn’t cross the point of the shoulder (the bony protrusion at the top of the front leg). A chest strap sitting on the shoulder point restricts forward leg extension and causes long-term gait problems in active dogs. If it sits too high, loosen the neck loop slightly to allow the chest strap to drop lower.
3. Belly Band / Girth Strap
The belly band runs under the abdomen just behind the front legs. Two fingers underneath — no gap, no compression. This strap is the most commonly under-tightened on harnesses: owners leave it loose assuming it’s “just support,” but a loose belly band is the primary escape route on step-in harness designs. Snug it up.
4. Back Panel (Vest Styles)
On vest-style harnesses, check that the back panel sits flat along the spine without bunching or twisting to one side. A twisted back panel indicates the front leg openings are uneven — re-fit from scratch, ensuring both front legs go through their respective openings symmetrically.
Step 4 — The Movement Test
A harness that passes the two-finger test at rest can still fail in motion. Before you trust the fit on a walk, run this quick movement check:
- Walk forward test — watch the chest strap from the front. It should stay centered on the sternum and not shift left or right as the dog walks. Lateral movement means the belly band is too loose.
- Backwards pressure test — apply gentle backwards pressure to the harness at the back clip attachment point. The chest strap should not migrate toward the front legs. If it shifts more than 1–2 cm, tighten the belly band or chest strap.
- Leg clearance check — watch the dog walk from the side. The front legs should swing forward freely without the chest strap catching at the top of the stride. If you see a shortened front stride, the chest strap is too high and is hitting the shoulder point.
- Sit and stand test — have the dog sit, then stand. The harness should move naturally with the body without riding up or creating pressure points. If the neck loop tightens when the dog sits, the fit is too snug at the neck — loosen slightly.
Breed-Specific Fitting Notes
Standard two-finger fitting works for proportional dogs. These breeds need additional attention:
Brachycephalic Breeds (Pug, French Bulldog, Shih Tzu, Bulldog)
Wide chest relative to neck — most harnesses will fit snugly at the chest but loosely at the neck. Prioritise chest strap snugness over neck loop snugness. The neck loop on a Frenchie will often sit slightly looser than ideal — this is acceptable as long as the chest and belly band are secure. Never over-tighten the neck loop on a brachycephalic breed; their compressed airways mean any neck restriction has faster consequences than on a long-muzzled breed.
Sighthounds (Greyhound, Whippet, Italian Greyhound)
Narrow heads, deep chests, and extremely low body fat make standard sizing unreliable. The neck loop will almost always be too wide relative to the head — these breeds can slip a standard neck loop even when the harness is correctly sized for their chest. Only use a multi-point chest-wrap or figure-8 harness on confirmed sighthound builds. Standard H-style or vest harnesses with a single neck loop are not suitable regardless of fit quality. See our guide on why dogs escape harnesses for the full mechanical explanation.
Dachshunds
Long torso, low clearance, and a chest that sits close to the ground. The belly band on standard harnesses often sits too far back on Dachshunds — past the rib cage and onto the softer abdominal area — which is uncomfortable and insecure. Look for harnesses with an adjustable belly band position, not just adjustable tightness. The band must sit just behind the front legs, not mid-abdomen.
Puppies
Puppies grow fast — check harness fit every two weeks during the first six months. A harness that fits correctly at 8 weeks can be dangerously tight at 12 weeks. Never leave a harness on an unsupervised puppy — growing dogs can shift into a too-tight harness quickly, and the consequences of restricted circulation are serious. Size up slightly when in doubt and adjust down with the straps.
Senior Dogs
Muscle loss in senior dogs means a harness that fitted correctly at age 5 may be too loose by age 10. Re-check fit at every vet visit and re-adjust seasonally. Senior dogs with arthritis or spondylosis also benefit from harnesses with a wider chest panel that distributes pressure over a larger surface area — narrow strap designs concentrate pressure on sensitive points in dogs with reduced muscle padding.
The 5 Most Common Harness Fitting Mistakes
- Sizing by weight, not chest girth — leads to the wrong size entirely; always measure first
- Leaving the belly band loose — the most under-tightened strap on most harnesses; it’s the primary escape route on step-in designs
- Chest strap sitting on the shoulder point — restricts gait and causes long-term shoulder joint strain in active dogs; drop it lower by loosening the neck loop
- Never re-checking fit after coat changes — dogs with seasonal coat thickness changes (Huskies, Collies, Golden Retrievers) need harness readjustment in spring and autumn as the undercoat grows and sheds
- Fitting the harness on a tense, moving dog — always fit with the dog calm and standing still on all four legs; fitting on a sitting or excited dog produces inaccurate strap tension
When to Replace a Harness
Even a well-fitted harness has a lifespan. Replace yours when:
- Buckles crack or don’t click securely — plastic fatigue is invisible until it fails; if a buckle feels different, replace it
- Stitching frays at load points — particularly at the leash attachment ring and the chest strap connection; these are the highest-stress points
- Webbing stretches and no longer holds adjustment — straps that slip back to a looser position after tightening have lost their grip; the harness can no longer be reliably fitted
- The leash D-ring shows wear or corrosion — metal fatigue at the attachment point is a safety risk on any dog that pulls or lunges
- Your dog has grown or lost significant weight — if the straps are fully extended or fully compressed to achieve the two-finger fit, it’s time for the next size
If you’re not sure which harness to replace yours with, our complete dog harness guide covers the best options across every size and use case — and our small dog harness guide has breed-specific picks for dogs under 20 lbs.
Frequently Asked Questions
How tight should a dog harness be?
Tight enough that exactly two fingers slide comfortably under any strap — no more, no less. This applies to the neck loop, chest strap, and belly band. Tighter than two fingers restricts movement, causes chafing, and can impair breathing on flat-faced breeds. Looser than two fingers allows the dog to shift position inside the harness and creates an escape risk, particularly on narrow-headed breeds.
Where should a dog harness sit on the body?
The neck loop sits at the base of the neck — not at the throat and not riding up toward the ears. The chest strap sits across the sternum, just below where the neck meets the chest, and must not touch the shoulder point (the bony protrusion at the top of the front leg). The belly band sits just behind the front legs at the narrowest part of the torso behind the rib cage.
How do I know if my dog’s harness is too tight?
Signs of a too-tight harness include: visible skin or coat compression under the straps, redness or hair loss at strap contact points after walks, restricted front leg stride (shortened steps), reluctance to move freely or refusal to walk, and difficulty breathing on flat-faced breeds. Apply the two-finger test — if you cannot comfortably slide two fingers under a strap, loosen it immediately.
How do I know if my dog’s harness is too loose?
A too-loose harness will shift position during walks — rotating sideways, riding up toward the neck, or allowing the chest strap to migrate toward the front legs. The dog may also be able to step out of it, particularly under backwards pressure. Apply the two-finger test in reverse: if three or more fingers slide easily under any strap, tighten it. Test under gentle backwards pressure — the chest strap should not move more than 1–2 cm.
Should I leave my dog’s harness on all the time?
No — harnesses should be removed when the dog is unsupervised, resting at home, or sleeping. Continuous harness wear causes coat matting and pressure sores at contact points, particularly on long-coated breeds. Use a flat collar with ID tags for continuous wear and put the harness on specifically for walks and outings.
How often should I check my dog’s harness fit?
Check fit every 2–4 weeks for puppies (they grow fast), every 1–2 months for adult dogs, and at the start of every season for dogs with thick seasonal coats. Also re-check after any significant weight change — illness, pregnancy, or weight loss or gain of more than 5–10% body weight will affect harness fit meaningfully.
Final Word on Harness Fitting
Harness fitting takes about four minutes the first time and thirty seconds every time after that. The two-finger rule applied to every strap is the only thing you need to remember. Get that right — combined with the correct size for your dog’s chest girth rather than their weight — and virtually every common harness problem disappears: escapes, chafing, gait restriction, and refusal to wear it.
A harness that fits correctly is one your dog forgets they’re wearing. That’s the goal — and it’s completely achievable with five minutes of careful adjustment on day one.
Affiliate Disclosure: GearForPet.com participates in affiliate programs. We may earn a small commission if you purchase through our links at no extra cost to you. Read our full disclosure.